Written By: DIY & Craft Contributor, Katie Femia
 I can’t lie to you. Today’s DIY is hard. You may not be able to get through it. Not because the materials are expensive. Not because it is time consuming. Not even because it is a “10” on the difficulty scale. But because if you are like me, I can finish off a bag of gumdrops in about five minutes flat! And since gumdrops are an important staple to this project, that could be a problem!
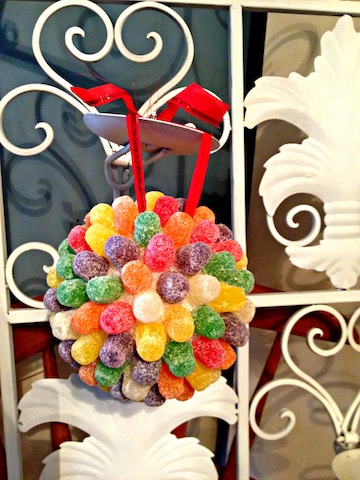
But if you think you can manage to control yourself, take a peek at this simple holiday DIY that can not only score you some whimsical home décor, but score you some major points with the kiddos! Gumdrop ornaments only take minutes to make, and require simple materials that won’t break your budget. Take a peek!
Supply List:
Small Styrofoam ball forms (These should be the smaller, lemon sized forms. They run about .99 cents and less at most craft stores and even Walmart.)
Ribbon
Several push pins
1-2 bags of gumdrops (My dollar store carries generous sized bags of these for $1.00. Depending on how many ornaments you are making, 1-2 bags should suffice.)
Hot glue sticks
Hot glue gun
Ready? Let’s go!
- First, tie a piece of ribbon into a loop. Secure it to the foam ball with a push pin. This will be how you hang your ornament, so make sure it is stuck on securely.
- Next, put a generous dab of glue on your foam ball. Attach a gumdrop so the flat side is flush against the foam.
- Continue attaching the gumdrops in this manner, alternating colors, until you have covered the entire ball.
- When the ball is covered, allow it to sit for an hour in order for the glue to dry and set.
- That’s it! Easy right? Now just find a place to hang it, such as your tree, from a chandelier, or even from coat hooks or wall hooks! These gumdrop ornaments are so fun and bright, they will offer a pop of color wherever you put them!
Tips and Tricks:
Use white foam balls instead of the green florist foam balls. The white ones stay firmer and won’t be as dark and dreary if you can see it through the cracks of the gumdrops. As always, use caution when operating a glue gun. Those stinkers can get very, very hot! A bowl of ice water kept nearby is perfect for the quick relief of drip burns. Last but not least, I know these ornaments are very sweet, but avoid storing them to reuse the following year. Heat can melt them or critters can find them, and you can have quite a mess on your hands!
Further this activity:
To make your ornament last the duration of the season, feel free to spray with a coat of clear craft sealant. This is available at most craft stores for around $4.00. Or if you are feeling really ambitious, make a half a dozen or so of these minus the hanging ribbon. Place them in a large decorative bowl for a festive centerpiece that your guests will be in awe over!
So grab your supplies, clear off a space, and get crafting! And while you are at it, grab a bag of gumdrops for yourself. You will deserve it after all of your hard work!
Photo credit: Katie Femia


I love this DIY gumdrop decoration! I have also seen it done with Hershey’s kisses. Both would be very hard to make without sampling the edible supplies 🙂
Sami, thanks for commenting. I think you can buy a bag to eat, and buy a bag to make an ornament. The best of both worlds 🙂
I haven’t done this with gum drops before. I’ve always used those gummy raspberries. Looks like this ornament will be made next weekend at the kids sleepover.
Kimberlee, if you do the Gumdrop DIY Ornament, can you please share the pic? I would love to see the final result 🙂
I most certainly will.
This looks like good family fun!